 I recently picked up a red Nintendo 3DS XL at a reasonable price, given the current scalping situation with 3DS systems. I’ve owned a couple of 3DS consoles in the past; the first was an original model back in 2011, which I traded in the following year for an XL model exactly like the one I just bought. That console was with me throughout my childhood, but sadly it stopped working and I had to get rid of it. Luckily, I recently found the old console’s SD card, which contained the NAND backup that’s automatically created when you install a CFW. After a bit of research, I’ll show you how to transfer most of the data from a NAND backup of one 3DS console to another.
WARNING: We will be handling files that are VERY sensitive and important to the console, which carries a real risk of turning the console into an expensive paperweight, so it is essential to create a backup of the target console’s NAND so you can restore it in case of a brick. If your source console is working, you should use the official file transfer tool as long as both consoles are (or aren’t) modified and are from the same region. I also cannot guarantee that this method is free from console bans by Nintendo, although with the shutdown of 3DS online services, this isn’t a major concern. As you might expect, any existing data on the destination console and its SD card will be deleted.
It’s worth noting that this method DOES NOT restore purchases made on the Nintendo eShop. To do this, you must link the new console to the original console’s Nintendo Network ID if it has already been unlinked; otherwise, you’ll need to contact Nintendo support via email or phone to have them unlink it remotely.
Requirements
To perform this procedure, you will need:
- A modified 3DS; it is recommended that both consoles have a similar main version (e.g., 11.XX)
- A valid NAND backup
- GodMode9 generates a SHA2 hash of the NAND backup to verify the file’s integrity
- The
movable.sedfile from the console itself, or you can extract it from theessential.exefsfile if you don't have it- GodMode9 also creates a backup of these files by default
- Please DO NOT use a
movable.sedfile obtained via brute-force tools (this does not apply if the file was obtained from the console itself), as it is very unstable and will eventually cause the device to brick
Procedure
 We'll start by extracting the necessary files from the backup. To do this, we’ll use the ninfs software. We’ll start by extracting the
 movable.sed file — if you don’t already have it on hand — using the program mentioned above. When mounting the file, we want to extract the file shown on the right. Next, we’ll change the file extension from .bin to .sed (simply rename it to movable.sed). It’s also a good idea to extract the otp.bin file to be able to extract the NAND, though it usually isn’t necessary.
Now we’ll extract the files from the NAND backup that we need. We’ll also need the boot9.bin file; you’ll likely find it on the SD card if your console is modified. If not, it can be obtained from other sources, since the file isn’t unique to each console. Once mounted, we’ll see a list of files. The one we’re interested in is ctrnand_full.img. Let’s mount it.
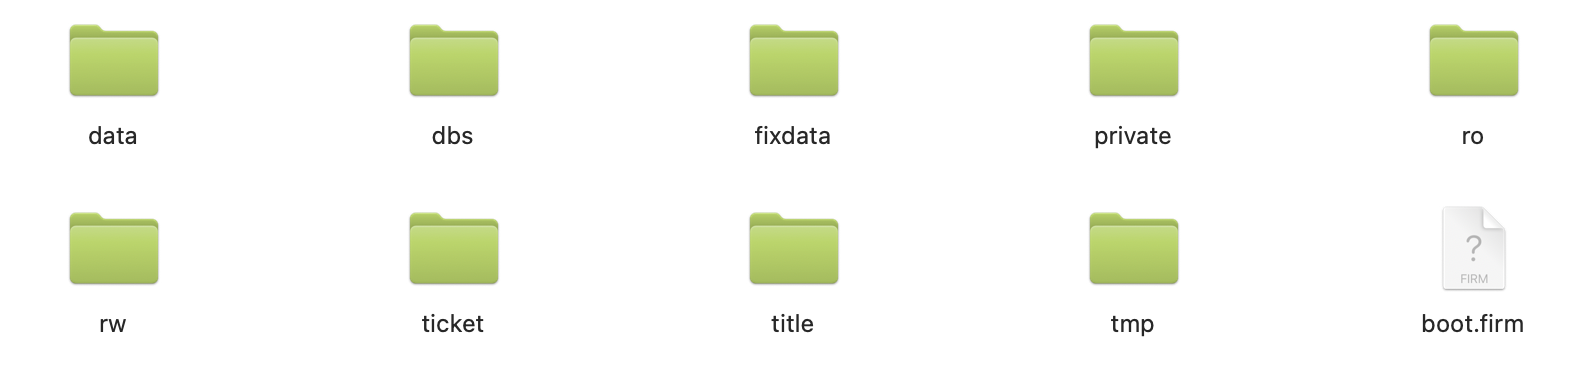
When mounted, the pictured folders will appear. Open the data folder, then navigate to the subfolder with the console's ID (a string of random characters), and copy the sysdata and extdata folders to a safe location. Once copied, open the sysdata folder in the backup. Several of the subfolders inside cannot be safely transferred to the console, so you’ll need to delete the folders that are NOT included in the list below (don’t worry, they don’t contain any relevant user data).
List of the only folders that the sysdata folder must contain for EUR 3DS consoles:
000200be - Miiverse

                0001000f - Unknown

                0002022b - Nintendo Zone

                0002022d - Face Raiders

                0002022e - AR Games

                00010011 - FS module

                00010022 - Pedometer

                00010026 - Streetpass

                00010032 - Friends

                00010034 - Spotpass

                00010035 - News

                0002009c - Game Notes

                0002009d - Internet Browser

                0002009f - Friend List

                00020222 - Activity Log

                00020224 - Nintendo 3DS Camera

                00020225 - Nintendo 3DS Sound

                00020227 - Mii Maker

                00020228 - Mii Plaza

                0004000e00022800 - Mii Plaza Update

                0004008c00022800 - Mii Plaza DLC
List of the only folders that the sysdata folder must contain for USA 3DS consoles:
000200bd - Miiverse

                0001000f - Unknown

                0002021b - Nintendo Zone

                0002021d - Face Raiders

                0002021e - AR Games

                00010011 - FS module

                00010022 - Pedometer

                00010026 - Streetpass

                00010032 - Friends

                00010034 - Spotpass

                00010035 - News

                00020093 - Game Notes

                00020094 - Internet Browser

                00020096 - Friend List

                00020212 - Activity Log

                00020214 - Nintendo 3DS Camera

                00020215 - Nintendo 3DS Sound

                00020217 - Mii Maker

                00020218 - Mii Plaza
We'll leave the extdata folder exactly as-is.
Next, we'll create a folder named nandfiles (for example), into which we'll place the sysdata and extdata folders, and then copy it to the SD card of the target console. We’ll copy the movable.sed file from the original console to the root of the SD card, and download the file MovableMoveover.gm9, which will go in the /gm9/scripts/ directory; and the file faketik.3dsx, which will go in the 3ds folder at the root of the SD card. Finally, we’ll replace the folders Nintendo 3DS, private, and DCIM (I think the latter can be merged without trouble) in the root directory of the destination console’s SD card with the same folders from the original console’s SD card. Remove the SD card and insert it into the 3DS console.
Turn on the console while holding down the Start button to launch GodMode9. If prompted to create a backup, do so. If prompted to set the date and time, do that as well. Once in the main menu, press the Home button, which will open a list of options on the bottom screen. Select Scripts... and then select MovableMoveover. Follow the steps shown on the console. When the process is complete, the console will restart and display the initial settings screen as if it had just been formatted (no data has been lost). Turn off the console.
Turn the console back on while holding down the Start button to launch GodMode9. Now navigate to the SYSNAND CTRNAND://data/ directory and delete the folder with the target console’s ID (which is not the same as the ID of the system folders we copied earlier) by pressing X, then A to confirm deletion. You’ll be prompted for a passcode for each operation you perform; when finished, always relock the NAND if prompted. Shut down the system by pressing Home and selecting the Poweroff system option.
This time, we’ll power on the console normally. It will display the initial setup screen again; we’ll power off the console once more. We’ll boot up again by pressing Start to enter GodMode9. Now we’ll navigate to the nandfiles folder that we created earlier on the SD card and copy the sysdata folder by pressing Y. Now navigate to the directory SYSNAND CTRNAND://data/ and press Y. Select the Copy file(s) option, unlock the NAND by entering the button combination, select Overwrite file(s), and relock the NAND. Now repeat the process for the extdata folder. Once done, press Home and turn off the console. When you turn it back on, complete the initial setup until you reach the Home menu.
At this point, we have already restored the NAND data, but only the default programs will appear in the Home menu. To fix this, open the Health and Safety app, open the Rosalina menu by pressing L, D-Pad Down, and Select simultaneously, go to Misc. options, select Switch hb. title, exit by pressing B, then exit and re-enter the same app, which will display the Homebrew Launcher menu. Select the Faketik app, let it do its magic, and exit by pressing B. Return to the Home menu, and the installed programs will appear, all wrapped as if they were freshly downloaded. Open them one by one (or you can skip this step by using the Homebrew app Cthulhu). With that, we’re almost done.
Final Steps: Fixing Mii's and Other Details
There's a small problem, though: the Mii's are still linked to the other console and may not appear or may not work properly. In my case, they showed up in my console but I couldn’t edit them. To fix this, I created a default Mii and extracted the file that contains Mii data called CFL_DB.dat (using extdata_dump.3dsx) and opened it with the Windows program 3DS Mii Edit Tool. I went to the “All Miis” tab, selected the Mii created with my console, clicked the “Set as personal Mii” button, and then returned to the “All Miis” tab and clicked the “Take ownership” button for each Mii. Then I selected the personal Mii I had before and clicked “Set as personal Mii” again. I saved the data and placed the resulting file in the 3ds folder at the root of the SD card. I also created a text file named config.txt with the following content:
RESTORE "CFL_DB.dat" "f000000b:/CFL_DB.dat"
Then I copied the extdata folder from the SD card again, just as we did before, and restarted the system. I opened the Homebrew Launcher, launched the extdata_dump program, selected the Restore extdata specified in config option, and the console was fully operational.
I ran into a couple more issues that were easily resolved. The first was related to the activity log; it appeared that the “Activity Log” app incorrecty reported 1,000 hours of game time. Editing this was easy using Cthulhu. The other problem was that the homebrew apps installed by default when modding the console weren’t showing up. I fixed this by repeating the step Finalizing Setup from the 3DS Hacks Guide.
With that, I was able to transfer the data from my long missing, old console to a brand-new, fully functional one.


This guide is based on one posted by several users on the gbatemp forum:
https://gbatemp.net/threads/manual-system-transfer-for-saves-content.388033
It also includes content from a Wiki Hacks Guide:
https://wiki.hacks.guide/wiki/3DS:Movable_Moveover
